
“How to fit running boards” sounds like a single task. In practice it is a chain of small decisions about mounting points, load paths, corrosion control, and clearance. The boards themselves are only the visible part; the real work is underneath, where vehicle variations and fastener choices decide whether the install stays quiet and stable over years.
Most running boards questions show up at the same moment: a new set arrives, the vehicle is on the drive, and the hardware bag looks universal even when the chassis is not. That mismatch between expectation and reality is where avoidable problems start—cross-threaded bolts, pinched wiring, brackets that sit slightly out of square, and steps that flex because the load is not being carried where the frame was designed to take it.
Quick Orientation: Fitting running boards usually means attaching brackets to existing factory points, aligning the step to the body line, and tightening fasteners to a controlled clamp load. Safe assumptions: there are often pre-existing threaded holes or studs; the install typically does not require drilling. Misleading assumptions: “all crew cabs mount the same” and “tight is tight” regardless of bolt size or coating.
What “Fit” Means Beyond Bolting Something On
In workshop terms, fit is the relationship between three things: the vehicle’s mounting geometry, the bracket system, and the final position of the step surface. A running board that looks straight from the side can still be mechanically “off” if the brackets are slightly twisted, because twist shows up later as squeaks, loosening, or uneven load on one side.
Clamp load matters. Bolts are not simply there to prevent parts falling off; they create friction between bracket and mounting point. Too little torque and the joint can slip under repeated stepping. Too much torque and threads can strip, coatings can crack, and corrosion can accelerate. For general fastening practice and torque concepts, the U.S. National Institute of Standards and Technology provides accessible background on measurement and traceability that underpins torque tools and calibration expectations.
Vehicle-Specific Reality: Why The Same Question Keeps Returning
Searches like how to fit Freelander running boards, how to fit Honda HR-V running boards, and how to fit Mazda CX-5 running boards are not really about the boards. They are about platform differences: pinch weld shapes, underbody shields, fuel and brake line routing, and where the manufacturer placed reinforced points.
Even within one model line, trim and year changes can shift what is “in the way.” Sensors, harness clips, and plastic aero panels are common. The UK’s Driver and Vehicle Standards Agency (DVSA) outlines a useful general principle in its MOT inspection guidance: modifications must not create unsafe projections or interfere with critical systems—an idea that applies directly to step clearance and secure mounting.
Core Mechanisms: Brackets, Load Paths, And Clearance
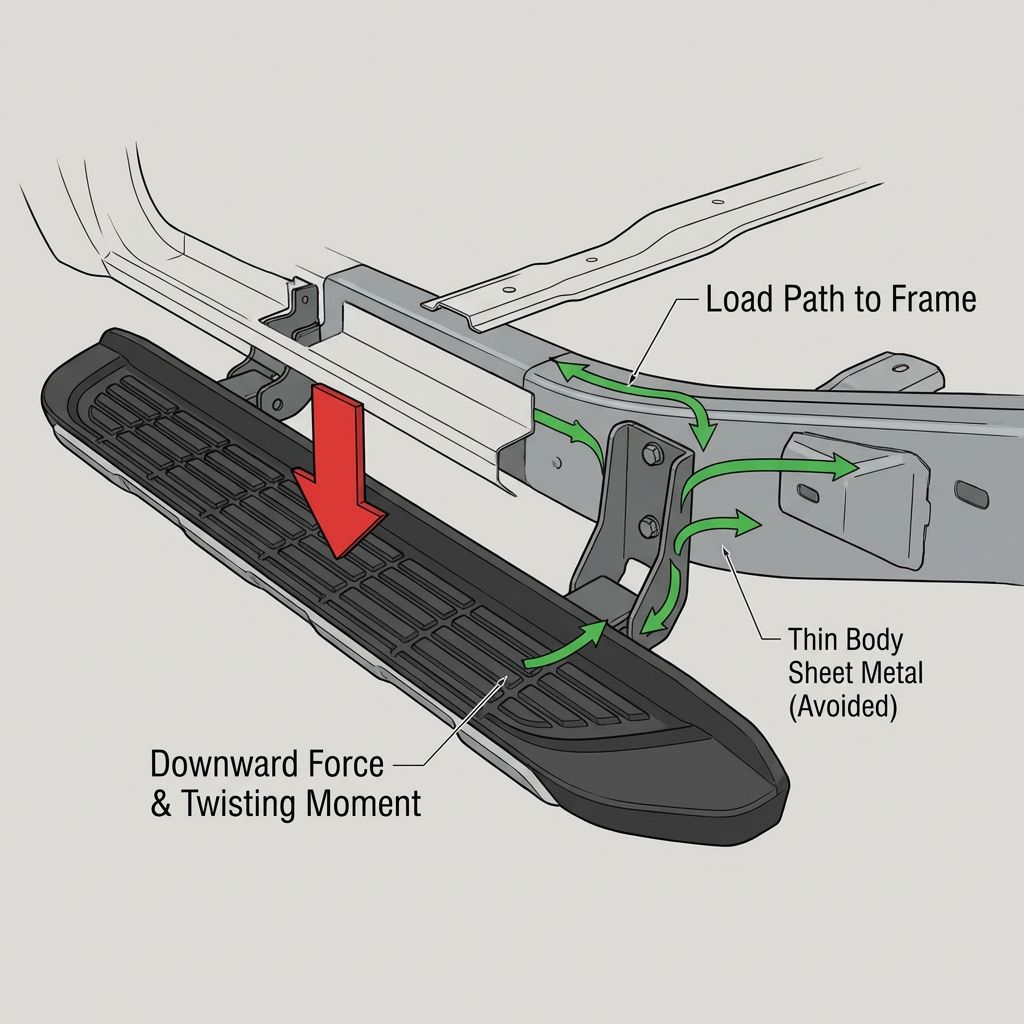
A person stepping on a running board creates a downward force and a twisting moment. Good bracket designs route that load into reinforced mounting points without relying on thin body sheet metal. Poor alignment can also reduce door clearance or place the step too far inboard, forcing awkward foot placement. OSHA’s guidance on walking-working surfaces highlights how slip resistance and stable stepping surfaces reduce fall risk—relevant context when considering tread texture, wet conditions, and how far the step sits from the door opening.
One sentence of context only: some listings, such as the COMNOVA running boards, include multiple brackets per side, which typically reflects an attempt to spread load across more mounting points rather than concentrating it at two locations.
Common Misconceptions That Create Most Problems
Issues tend to come from a few repeated misconceptions rather than rare defects.
- Assuming symmetry: left and right sides can differ because of exhaust routing, fuel lines, or underbody shielding.
- Assuming the lowest position is best: lower steps can be easier to use but may reduce ground clearance and increase strike risk over ramps or uneven terrain.
- Assuming hardware is interchangeable: mixing bolts and washers can change clamping behavior, especially with coated fasteners or captive nuts.
How To Fit Running Boards Without Creating Long-Term Problems

Most difficulties linked to how to fit running boards are not dramatic in the moment of installation; they show up months later. The common pattern is a small misalignment that changes loading paths: a bracket that is not seated flat, a fastener that bottoms out early, or a rail that sits slightly twisted. Under repeated step-on loads, that asymmetry can translate into movement, noise, or accelerated wear around mounting points. The practical implication is that “it fits” is not the same as “it will stay stable after thermal cycling, vibration, and road spray.”
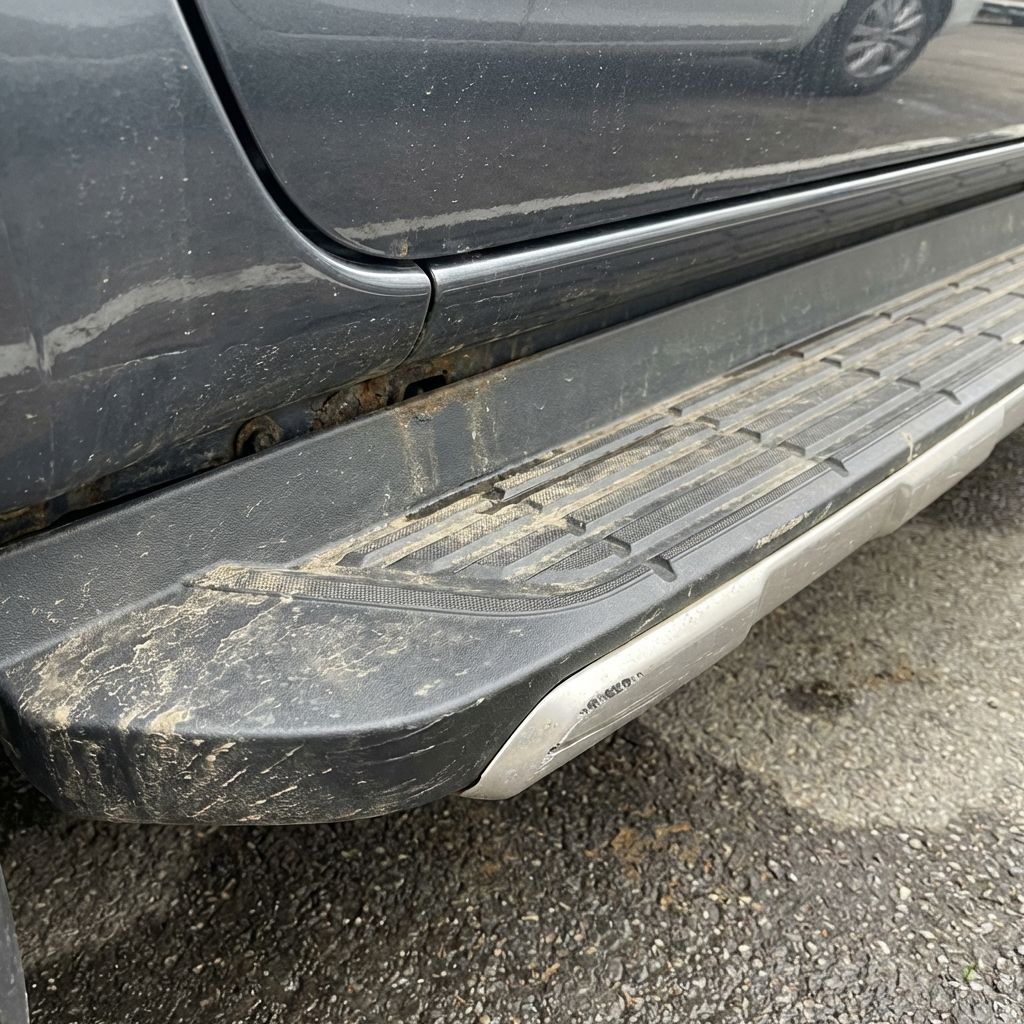
Another recurring issue is surface preparation. On vehicles that have seen winters, the underside often carries packed debris and corrosion scale that prevents clean metal-to-metal contact. Even where factory holes exist, trapped grit can keep a bracket proud by a millimetre or two. That is enough to change clamp force once bolts are torqued. Over time, loss of clamp force is what allows micro-movement, and micro-movement is what enlarges holes and damages coatings.
Vehicle-Specific Variability That Changes The Outcome
Guides on how to fit running boards can look universal, yet the real variability is in the vehicle: frame geometry, rocker panel clearance, and the condition of threaded inserts. A body-on-frame pickup typically offers more robust mounting points than a compact crossover, but it also sees higher torsional flex off-road and when loaded. That flex can make a rigidly aligned board feel slightly “alive” unless the brackets allow the intended compliance.
The cluster searches around how to fit Freelander running boards, how to fit Honda HR-V running boards, and how to fit Mazda CX-5 running boards reflect this difference in platform constraints. Crossovers often have tighter packaging near pinch welds and undertrays, so clearance to plastic shields and drainage paths becomes more sensitive. What looks like a minor relocation of a bracket can end up interfering with splash protection or trapping moisture against seams.
Load Paths, Torque, And Why “Tight” Is Not Always “Secure”
When thinking through how to fit running boards, it helps to picture the step load travelling through the board into brackets and then into the vehicle structure. If the bracket footprint is small or uneven, contact pressure rises and coatings are stressed. If torque is too low, clamp force is insufficient and joints can slip. If torque is too high, threads can be damaged or thin sections can deform, again reducing clamp force after a few heat cycles.
In professional practice, torque specifications exist to balance these risks, and the broader principle is reinforced across automotive maintenance education materials that emphasise correct tightening methods and calibrated tools, such as those referenced by the National Institute for Automotive Service Excellence at https://www.ase.com for training and workmanship standards. The point is not the brand of tool; it is repeatability and avoiding guesswork.
Nuances And Limitations In Real Road Use
Even a well-executed how to fit running boards approach can run into context-dependent limits. Winter road salt, coastal humidity, and frequent gravel roads change maintenance needs. A board that is structurally fine may still become slippery if the step surface holds mud or if ice builds along the outer edge. Clearance matters as well: a low-sitting installation can reduce breakover angle and increase strike risk on kerbs or ruts.
Several practical factors tend to decide whether the setup stays trouble-free:
- Drainage and airflow: trapping moisture against seams or under covers tends to accelerate corrosion at fasteners and mounting points.
- Fastener compatibility: mixed metals can promote galvanic corrosion in wet conditions, especially where protective coatings are damaged.
- Positioning relative to doors: small fore-aft shifts can change how debris is thrown onto sills and how easily doors clear in winter grime.
- Inspection access: installations that hide hardware completely can look clean but make periodic re-checks less likely to happen.
When “Fits” Becomes A Fitment Problem
Fitment complaints often trace back to assumptions made early in how to fit running boards: that holes are perfectly centred, that left and right sides are symmetrical, or that all supplied spacers are necessary. Vehicles can have production tolerances, prior repairs, or underbody damage that shifts alignment. A good diagnostic mindset is to treat unexpected resistance or offset as information, not as something to overpower with leverage.
As a single illustrative example only, a kit like COMNOVA 6″ Running Boards is typically supplied with multiple brackets and covers, which increases the importance of verifying that every contact surface is seated as intended rather than relying on visual symmetry alone.
How To Fit Running Boards Without Creating New Problems
When people search how to fit running boards, the hidden goal is usually not the fitting itself—it is avoiding the secondary effects: noise that appears at speed, corrosion around fresh holes, a step that sits slightly off-level, or a mount that loosens after the first hard winter. The most reliable outcomes tend to come from treating the job as alignment and load management, not as a quick bolt-up.
Fit quality is mostly decided by three realities that are easy to underestimate: the condition of the vehicle’s mounting points, the tolerance stacking across multiple brackets, and the way road spray reaches any disturbed coating. If any of those are marginal, the “installed” result can still feel unfinished.
- Alignment matters because a small twist becomes noticeable every time the door opens; the step reads “crooked” even when the hardware is tight.
- Fastener Control matters because overtightening can deform thin sections or strip threads, while undertightening invites movement that turns into squeaks.
- Corrosion Protection matters because exposed metal at a drilled or scratched point is where rust tends to start, especially in salted-road climates.
For vehicle-specific searches like how to fit Freelander running boards, how to fit Honda HR-V running boards, or how to fit Mazda CX-5 running boards, the principle stays the same: the details change around where the structure is strong enough to accept load and how much clearance is available around jacking points and drain paths.
Where Expectations Commonly Drift From Reality
Running boards are often imagined as “set and forget,” but they sit in a harsh zone: constant water impact, grit abrasion, temperature cycling, and vibration. Even a careful fit may still require a follow-up check after a short period of driving because settling can occur as coatings compress and clamps seat.
Ground clearance is another frequent mismatch. A step can improve access while also becoming a contact point on steep driveways or uneven tracks. That trade-off is not a defect; it is geometry. Likewise, added width can change how road spray is thrown along the side of the vehicle, which may increase dirt accumulation in certain weather patterns.
Authoritative safety guidance generally emphasizes secure attachment, correct torque, and ongoing inspection for add-on exterior components. For general vehicle maintenance and safety inspection principles, the National Highway Traffic Safety Administration provides consumer-facing safety information at https://www.nhtsa.gov, and the UK’s Driver and Vehicle Standards Agency outlines roadworthiness expectations (including condition and security of external parts) at https://www.gov.uk/government/organisations/driver-and-vehicle-standards-agency.
Practical Clarifications That Set A Better Standard
How to fit running boards is also a question about what “finished” should look like. A clean result is usually quiet, level, and visually consistent side-to-side. Less obvious—but just as important—is that it does not block access to service points and does not create new pinch or snag areas around entry.
Situations where it may feel limiting tend to be predictable:
- Frequent off-pavement driving where the lowest edge becomes a regular contact point.
- Regions with heavy road salt where disturbed coatings and trapped debris accelerate corrosion unless cleaned regularly.
- Vehicles with prior underbody repairs where alignment references are no longer perfectly symmetrical.
The most realistic expectation is not perfection on day one; it is a stable installation that stays stable after retightening and routine checks.
FAQ: Running Boards Questions People Actually Mean
When Searching “Questions Running Boards,” What Is Usually Being Asked?
Most people are trying to decode whether the information they found is vehicle-specific, whether it assumes existing factory mounting points, and whether it accounts for long-term loosening or corrosion. It is essentially a search for reliable context, not just steps.
Why Can A Step Feel Solid At First But Develop Noise Later?
Small movements can appear after vibration cycles as coatings compress and hardware beds in. Noise often signals contact between parts or a fastener that is no longer holding consistent tension.
Is Drilling Always A Red Flag, Or Is It Sometimes Normal?
It depends on how the vehicle is designed and what mounting provisions exist. Drilling can be acceptable when it is structurally appropriate and corrosion protection is restored, but it raises the bar for careful finishing.
What Makes Fitment Guidance “Vehicle-Specific” Rather Than Generic?
Vehicle-specific guidance identifies exact attachment locations, accounts for brake lines and wiring routing, and considers clearance around jacking points and drains. Generic guidance tends to skip those constraints and can miss the reasons a fit becomes troublesome.
How Often Should The Hardware Be Checked After Installation?
A recheck after a short period of normal driving is a common best practice, then periodically as part of routine underbody inspection—especially after winter conditions or rough-road use. The goal is early detection of looseness before it becomes wear or corrosion.